In the realm of print and publishing design, completing the design phase marks just the commencement of the prepress phase. Although you may have finished your creative work, the next step is to ensure that your file is ready for printing exactly as you envisioned it.
Most printers are willing to provide specifications for file submission. Their aim aligns with yours: to save time and money, deliver projects on schedule, and achieve the best possible results. Adhering to their specifications is key. Additionally, using a prepress checklist before submitting your file to the printer can prevent your project from being rejected or incurring additional costs for file corrections.
With over 25 years of experience in print production, I always use a prepress checklist before sending my files to the printer or imposing them myself for press. One crucial item on my checklist is to confirm (or adjust) the ink density in my images to ensure it falls within the limits.
Understanding Ink Density
Firstly, let’s clarify what is meant by ink density.
When multiple colors are printed on top of each other, there is a limit to the amount of ink that can be applied to paper. This maximum dot percentage is referred to as either Total Ink Coverage (TIC) or Total Area Coverage (TAC).
What happens when a designer disregards this ink limit? The ink laid down last on press will not adhere properly to the previous layers and may not dry correctly on the press sheets. This issue, known as offsetting, occurs when the ink from a still-wet sheet transfers to whatever is stacked on top of it. Trust me, this is a mess you want to avoid. Let’s explore how to do that.
Specifications for Total Ink Coverage
Ink coverage is described in percentages. For instance, if you have the maximum 100% of Cyan, Magenta, Yellow, and Black, you’d have 400% TIC, equivalent to the Registration swatch in a CMYK InDesign file.
Several factors determine the maximum ink amount suitable for a particular job, including
- The printing process (e.g., offset, digital)
- The paper type (coated vs. uncoated stock)
- The number of inks used in one press run
- The physical characteristics of the press, including its speed
Failure to correct ink density can result in muddy-looking neutrals where the mix of cyan, magenta, and yellow creates an unpleasant brown color instead of a neutral gray.
While it is always best to consult your print service provider for their recommended TIC/TAC, the following percentages are industry averages and can serve as a basic guideline:
- Sheetfed offset on coated paper (typical commercial printing – GRACoL®): 320%
- Heatset web offset (e.g., magazines): 300 to 320%
- SWOP®: 300%
- FOGRA39: 300%
Measuring Ink Density
So, how do we measure ink density in our files?
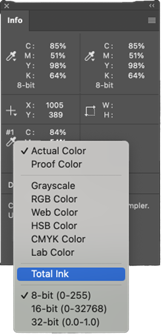
In Photoshop, you can use the Eyedropper tool and the Info panel. Customize your Info panel to always display Total Ink in the top left section:
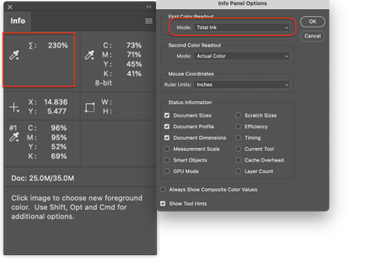
- Go to the Info panel flyout menu and choose Panel Options.
- Change the second color readout to Total Ink. Notice the Sigma (the symbol for sum) next to the second eyedropper icon.
You can also toggle the arrow under any eyedropper and change the readouts on the fly to measure Total Ink.
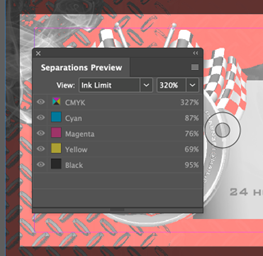
Checking Ink Density Values in inDesign
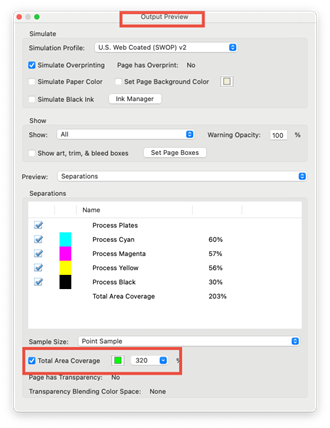
In InDesign, check total ink in the Separations Preview panel (Window > Output > Separations Preview). Set the View menu in the panel to Ink Limit and adjust the total percentage to your specific output requirements.
If you need to check the total ink in an Illustrator graphic, place the Illustrator file into an InDesign layout and check the ink numbers there.
Alternatively, open the file in Adobe Acrobat and use the Output Preview panel, found in the Print Production tools.
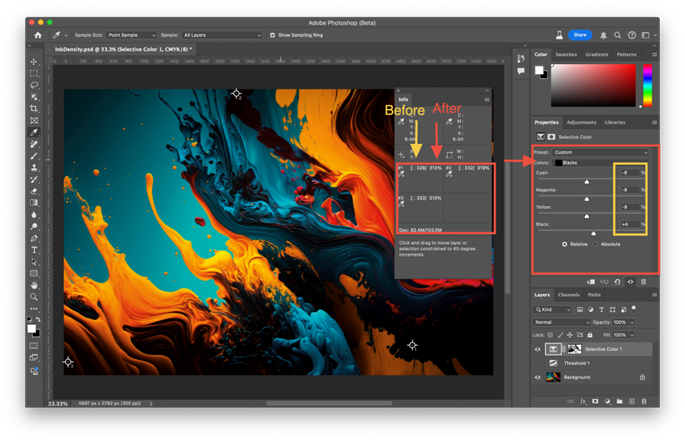
My preferred method for adjusting ink density in Photoshop (which is non-destructive) is using the Selective Color Layer Adjustment. This method is similar to Gray Component Replacement (GCR).
I reduce similar amounts of cyan, magenta, and yellow in the darkest areas and compensate by adding half as much black back in. This reduces the overall TIC/TAC and ensures the desired results on press.
Bonus Tip! Finding the Deepest Shadows in Your Photoshop Image
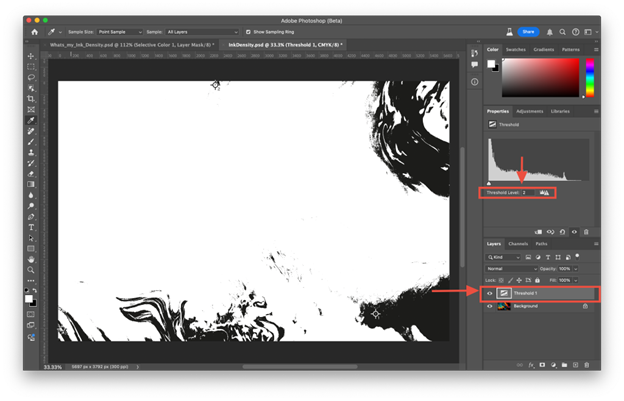
- Create a non-destructive Threshold adjustment layer in Photoshop. This will produce a black and white posterization effect on the layer.
- Open the Properties panel for the Threshold adjustment layer.
- Drag the slider all the way to the left, setting it as low as possible while still retaining some black pixels. These black pixels indicate the darkest shadow areas in your image.
- Use the Eyedropper tool (hold down the Shift key to enable the Color Sampler tool) to place sampling points on the image.
- Turn off the visibility of the threshold layer.
- Ensure your document is in CMYK mode.
- In the Channels panel, target the black channel and make a selection from it using the selection button at the bottom of the panel. (see image below)
- With the selection active, go to the Adjustments panel and choose the Selective Color adjustment. This will create a new layer with a layer mask.
- Click on the mask thumbnail, then go to the Properties panel and click the button to invert the mask. Remember, in masks, black conceals and white reveals. Your mask should be lighter in the darker areas of the image.
- In the Selective Color adjustment, go to the black color channel and enter these values to start: C: -8, M: -8, Y: -8, K: +4. Then check the total ink to see if it’s below the maximum for your print job. If not, reduce the C, M, and Y and increase the black further. Always adjust the values equally. Tip: If your ink density still exceeds the recommended threshold, you can adjust the values equally, ex. C: -16, M: -16, Y: -16, K: +8., or... Just duplicate the layer!
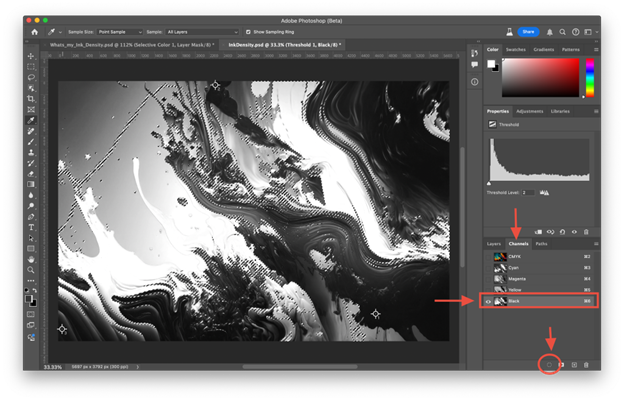
Channels panel - Black selection (step 2 above).
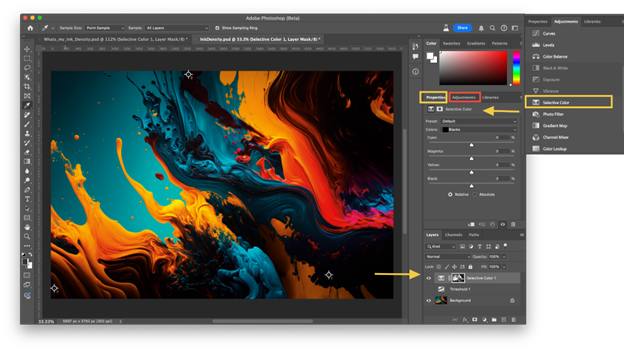
Adjustments panel - Choose Selective Color (step 3 above).
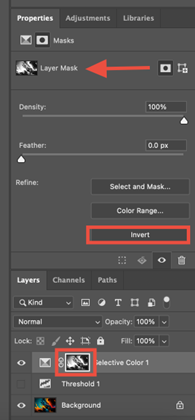
Properties panel - Invert the Mask (step 4 above).
Properties panel - Duplicate the layer (step 5 above).
By following these steps, you can effectively and non-destructively adjust the ink density to be under the specified limit for your print job, as evidenced by the before and after values in the Info panel.
If you wish to automate these steps, you can create an action to perform all of these adjustments. And as a bonus, I have included the action here!
I have also included a video on how the action works!
Did you find this tip helpful?! Subscribe the the ColorPro® newsletter here, for insight across color, prepress, print and more to optimize print output. Read past articles here.
Amybeth Menendez is also an instructor for PRINTING United Alliance’s Color Management Professional® Online Training & Certification. Learn with Amybeth within Color Management Professional Fundamentals and Color Management Professional Prepress available on-demand at iLEARNING+.
Amybeth will also be speaking at the upcoming PRINTING United Alliance webinar - AI in Image Creators for Commercial Print and Publishing on July 17. Register here to attend.
Color Management Professional®, GRACoL®, and SWOP® are registered trademarks of PRINTING United Alliance.